Exchange Server Backup Part II: Restoring Exchange Using Windows Backup
This is a continuation of my previous article entitled “Exchange Server Backup: Using Windows Native Backup”. It assumes a backup was performed using the steps described in that article. It also assumes the server running Exchange is still functioning. Restoring an entire Exchange server, operating system and all will be a topic for another article.
Prior to running a restore, it is extremely important that you first perform an offline backup of your database. If for any reason the restore process fails, having an offline backup will give you the option of repairing your database files and at least getting some of your data back.
Make sure you are logged into an administrative account to perform the functions in this article.
To perform an offline backup:
- Shut down the information store
Right-click My Computer > click Manage > go to Services and Applications > Services > right-click Microsoft Exchange Information Store and choose “Stop” - Verify the location of your private and public database files, and transaction log files. On Exchange 2000 these are located by default in C:\Program Files\Exchsrvr\MDBDATA, however it is common practice to place the database files on a separate drive from the transaction log files.
- Copy the database files (.edb), the streaming database files (.stm), checkpoint file (.chk) and the log files (E0*.log) to another location. If the files are all in one directory, then you could just copy the entire MDBDATA folder to a backup location.
To restore Exchange:
Make sure the Information store is started
From Exchange System Manager, navigate to Administrative GroupsàFirst Administrative GroupàServersàServernameàFirst Storage Group
Right-click the store you are going to restore and choose “Dismount Store”
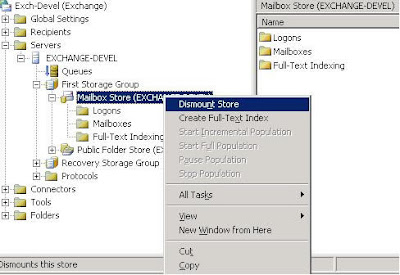
After the store has dismounted, right-click again and choose “Properties”
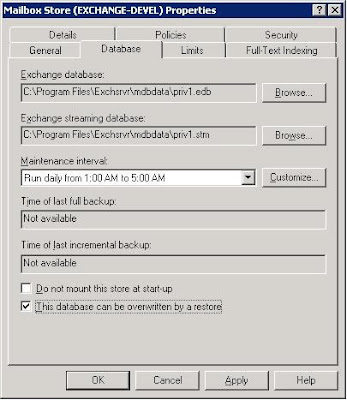
Click the database tab and select “This database can be overwritten by a restore”
 6. Click Start > Programs > Accessories > System Tools > and click Backup
7. If backup starts in wizard mode, select advanced.
Click on the Tools tab and select “Restore Wizard”
On the Welcome screen, click Next
On the What to Restore screen, if your backup file is not listed:
Click browse
Browse to the location of your backup file (.bkf)
Click OK to catalog the backup file
On the What to Restore screen, choose the mailbox store you want to restore and log files
Click Next
Verify that your server name is listed under Restore To, choose a temporary path for log and patch files, and select Last Restore Set (unless you will be restoring incremental backup files after this)
Click Next to start the restore process
When the restore is complete, click close or you could view the report
Return to Exchange System Manager and mount your restored mail store
If the restore process was successful, the store should mount without error
At this point you will want to connect to your exchange server with a client to test functionality and make sure everything is OK. This guide describes a very basic restore scenario, as mentioned earlier you may run into a situation where your whole server needs to be restored, you may need to only restore a particular mailbox, or you may want to set up an identical server to periodically test the restore process. Some of these scenarios will be discussed in future articles.
See ya!
John
